Passkey Demo App with WebAuthn and Ethereum

Introduction
In the realm of decentralized applications (dApps), user authentication remains a critical aspect. Traditional methods often rely on centralized servers, which can be a point of vulnerability. Enter Passkey: a decentralized authentication method that leverages the power of WebAuthn and Ethereum.
What is Passkey?
Passkey is a concept where users can authenticate themselves using cryptographic keys instead of traditional usernames and passwords. By integrating WebAuthn, a web standard for secure authentication, with Ethereum, a decentralized blockchain platform, Passkey offers a robust and secure authentication mechanism for dApps.
In this guide, we'll walk you through creating a demo app that showcases this integration using create-react-app.
Use cases
Before jumping onto the tutorial, let us look at some use cases for a passkey type encryption on the decentralized web. The use cases ranges all the way from:
- Decentralized Social Media
- DeFi Applications
- Healthcare Record Management
To more general application like:
- Website and Application Authentication
- Multi-Factor Authentication (MFA)
- Secure Document Access
Basically anything that needs frequent signing for authentication can make use of Lighthouse Passkey authentication.
Prerequisites
Ensure you have Node.js and npm installed. If not, download and install them from Node.js official website.
Setting Up
- First, let's create a new React app:
npx create-react-app passkey-demo
cd passkey-demo
- Install the necessary packages:
npm install axios
Utility Functions
These functions will aid in the authentication process:
- Fetching Authentication Message
const getAuthMessage = async (address) => {
  try {
    const data = await axios
      .get(`https://encryption.lighthouse.storage/api/message/${address}`, {
        headers: {
          "Content-Type": "application/json",
        },
      })
      .then((res) => res.data[0].message);
    return { message: data, error: null };
  } catch (err) {
    return { message: null, error: err?.response?.data || err.message };
  }
};
- Buffer and Base64 Conversions
function bufferToBase64url(buffer) {
  const byteView = new Uint8Array(buffer);
  let str = "";
  for (const charCode of byteView) {
    str += String.fromCharCode(charCode);
  }

  // Binary string to base64
  const base64String = btoa(str);

  // Base64 to base64url
  // We assume that the base64url string is well-formed.
  const base64urlString = base64String
    ?.replace(/\+/g, "-")
    ?.replace(/\//g, "_")
    ?.replace(/=/g, "");
  return base64urlString;
}

function base64urlToBuffer(base64url) {
  let binary = atob(base64url?.replace(/_/g, "/")?.replace(/-/g, "+"));
  let length = binary.length;
  let buffer = new Uint8Array(length);

  for (let i = 0; i < length; i++) {
    buffer[i] = binary.charCodeAt(i);
  }

  return buffer;
}
- Transforming Public Key
function transformPublicKey(publicKey) {
  const selected_key_index = 0;
  let transformedPublicKey = {
    ...publicKey,
    challenge: new Uint8Array([...publicKey.challenge.data]),
    allowCredentials: [
      {
        type: "public-key",
        id: base64urlToBuffer(
          publicKey.allowCredentials[selected_key_index]?.credentialID
        ),
      },
    ],
  };

  return [
    transformedPublicKey,
    publicKey.allowCredentials[selected_key_index]?.credentialID,
  ];
}
The Main App
Our main React component will handle user interactions:
import React, { useState } from "react";
import axios from "axios";
import "./App.css";

function App() {
  // State variables for account, error, chain ID, keys, and token
  const [account, setAccount] = useState("");
  const [error, setError] = useState("");
  const [chainId, setChainId] = useState("");
  const [keys, setKeys] = useState({});
  const [token, setToken] = useState("");

  // Function to connect to the Ethereum wallet
  const connectWallet = async () => {
    if (window.ethereum) {
      try {
        // Request account access
        const accounts = await window.ethereum.request({
          method: "eth_requestAccounts",
        });
        setAccount(accounts[0]);
        const chainId = await window.ethereum.request({
          method: "eth_chainId",
        });
        setChainId(chainId);
      } catch (error) {
        console.error("User denied account access");
      }
    } else {
      console.error("Ethereum provider not detected");
    }
  };

  // Function to disconnect from the Ethereum wallet
  const disconnect = () => {
    setAccount("");
    setChainId("");
  };

  // Function to sign a message using the Ethereum wallet
  const signMessage = async (message) => {
    try {
      const signature = await window.ethereum.request({
        method: "personal_sign",
        params: [account, message],
      });
      return signature;
    } catch (error) {
      setError(error.toString());
    }
  };

  // Convert account to lowercase for uniformity
  const username = account.toLowerCase();

  // Function to login using Passkey
  const login = async () => {
    try {
      const startResponse = await axios.post(
        "https://encryption.lighthouse.storage/passkey/login/start",
        {
          address: username,
        }
      );
      const publicKey = startResponse.data;
      const [transformedPublicKey, credentialID] = transformPublicKey(publicKey);

      // Get credentials using WebAuthn
      const credential = await navigator.credentials.get({
        publicKey: transformedPublicKey,
      });

      // Convert credential to a format suitable for the backend
      const serializeable = {
        authenticatorAttachment: credential.authenticatorAttachment,
        id: credential.id,
        rawId: bufferToBase64url(credential.rawId),
        response: {
          attestationObject: bufferToBase64url(credential.response.attestationObject),
          clientDataJSON: bufferToBase64url(credential.response.clientDataJSON),
          signature: bufferToBase64url(credential.response.signature),
          authenticatorData: bufferToBase64url(credential.response.authenticatorData),
        },
        type: credential.type,
      };

      const finishResponse = await axios.post(
        "https://encryption.lighthouse.storage/passkey/login/finish",
        {
          credentialID,
          data: credential,
        }
      );
      const token = finishResponse.data.token;
      setToken(token);
      if (token) {
        alert("Successfully authenticated using webAuthn");
      }
    } catch (error) {
      console.error("Error during login:", error);
    }
  };

  // Function to register using Passkey
  const register = async () => {
    try {
      const { message } = await getAuthMessage(account.toLowerCase());
      const signedMessage = await signMessage(message);
      const response = await axios.post(
        "https://encryption.lighthouse.storage/passkey/register/start",
        {
          address: account.toLowerCase(),
        }
      );
      const publicKey = {
        ...response.data,
        challenge: new Uint8Array([...response.data?.challenge?.data]),
        user: {
          ...response.data?.user,
          id: new Uint8Array([...response.data?.user?.id]),
        },
      };

      // Create credentials using WebAuthn
      const data = await navigator.credentials.create({ publicKey });

      const finishResponse = await axios.post(
        "https://encryption.lighthouse.storage/passkey/register/finish",
        {
          data,
          address: username,
          signature: signedMessage,
          name: "MY Phone",
        }
      );

      const finishData = await finishResponse.data;
      if (finishData) {
        alert("Successfully registered with WebAuthn");
      } else {
        throw new Error("Registration was not successful");
      }
    } catch (error) {
      alert(error.message);
    }
  };

  // Function to delete credentials
  const deleteCredentials = async () => {
    try {
      const startResponse = await axios.post(
        "https://encryption.lighthouse.storage/passkey/login/start",
        {
          address: username,
        }
      );
      const publicKey = startResponse.data;
      const { message } = await getAuthMessage(account.toLowerCase());
      const signedMessage = await signMessage(message);
      const response = await axios.delete(
        "https://encryption.lighthouse.storage/passkey/delete",
        {
          data: {
            address: account.toLowerCase(),
            credentialID: publicKey.allowCredentials[0]?.credentialID,
          },
          headers: {
            "Content-Type": "application/json",
            Authorization: `Bearer ${signedMessage}`,
          },
        }
      );
    } catch (error) {
      alert(error.message);
    }
  };

  // Render the app UI
  return (
    <div className="App">
      <header className="App-header">
        {!account ? (
          <button className="App-link" onClick={connectWallet}>
            Connect Wallet
          </button>
        ) : (
          <button className="App-link" onClick={disconnect}>
            Disconnect
          </button>
        )}
        <p>{`Account: ${account}`}</p>
        <p>{`Network ID: ${chainId ? Number(chainId) : "No Network"}`}</p>
        <p>
          Edit <code>src/App.jsx</code> and save to reload.
        </p>
        {account && (
          <>
            <button className="App-link" onClick={register}>
              Register
            </button>
            <button className="App-link" onClick={login}>
              Login
            </button>
            <button className="App-link" onClick={deleteCredentials}>
              Delete
            </button>
            <textarea
              style={{ fontWeight: "0.9rem", maxWidth: "80vw" }}
              value={`Bearer ${token}`}
            ></textarea>
          </>
        )}
      </header>
    </div>
  );
}
Let's Dive Into the Core Functions:
-
Connecting to Ethereum Wallet
connectWalletFunction Explanation:- Purpose:
- The
connectWalletfunction is designed to establish a connection with the user's Ethereum wallet.
- The
- Successful Connection:
- Upon a successful connection, the function fetches the user's Ethereum account address and the associated chain ID.
- These details, namely the account address and chain ID, are subsequently updated in the component's state.
- Denied Access:
- In scenarios where the user opts to deny access to their Ethereum wallet, an error message stating "User denied account access" is duly logged to the console.
- Ethereum Provider Detection:
- The function proactively checks for the existence of an Ethereum provider in the user's browser. This is typically facilitated by browser extensions such as MetaMask.
- In the absence of an Ethereum provider, an error message "Ethereum provider not detected" is registered in the console.
- Purpose:
-
Disconnecting from the Ethereum Wallet
disconnectFunction Explanation:- Purpose:
- The
disconnectfunction allows users to sever their connection from the Ethereum wallet.
- The
- State Reset:
- Upon invocation, the function resets the
accountandchainIdstate variables to their default values, effectively logging the user out of their Ethereum wallet.
- Upon invocation, the function resets the
- Purpose:
-
Signing a Message with Ethereum Wallet
signMessageFunction Explanation:- Purpose:
- The
signMessagefunction is crafted to solicit a signature from the user's Ethereum wallet for a specified message.
- The
- Signature Request:
- The function dispatches a request to the user's Ethereum wallet, urging it to sign the provided message.
- Error Handling:
- Should there arise an error during the signing process, this error is not only logged to the console but also updated in the component's state.
- Purpose:
-
Logging in Using Passkey
loginFunction Explanation:- Purpose:
- The
loginfunction orchestrates the login process leveraging Passkey.
- The
- Initial Request:
- The function initiates the login process by dispatching a request, which in turn retrieves the public key.
- Credential Creation:
- Utilizing the WebAuthn API, the function prompts the browser to generate credentials.
- Finalizing Login:
- Post the creation of credentials, these are dispatched to the server to culminate the login process.
- Token Retrieval:
- On successful authentication, a token is fetched and updated in the component's state.
- Purpose:
-
Registering with Passkey
registerFunction Explanation:- Purpose:
- The
registerfunction manages the user registration process via Passkey.
- The
- Message Retrieval:
- Initially, the function fetches an authentication message and subsequently requests the user's Ethereum wallet to sign it.
- Registration Start:
- A request is dispatched to commence the registration process, fetching the public key in the process.
- Credential Creation:
- The WebAuthn API is invoked to prompt the browser to generate credentials.
- Finalizing Registration:
- Once credentials are generated, they, along with other pertinent details, are sent to the server to finalize the registration.
- Purpose:
-
Deleting Credentials
deleteCredentialsFunction Explanation:- Purpose:
- The
deleteCredentialsfunction facilitates the removal of user credentials from the system.
- The
- Initial Request:
- The function begins by initiating a request to retrieve the public key.
- Message Retrieval and Signature:
- An authentication message is fetched, which is then signed by the user's Ethereum wallet.
- Deletion Request:
- A delete request is dispatched to the server, carrying the user's address and credential ID, to remove the associated credentials.
- Error Handling:
- If any errors arise during the deletion process, they are presented to the user via an alert.
- Purpose:
Rendering the App UI
return Function Explanation:
- Main Container:
- The entire UI is wrapped inside a
<div>element with a class of "App".
- The entire UI is wrapped inside a
- Header:
- The main interactive elements and displays are located within a
<header>element with a class of "App-header".
- The main interactive elements and displays are located within a
- Wallet Connection:
- Depending on the user's Ethereum account status, either a "Connect Wallet" or "Disconnect" button is displayed.
- Account and Network Display:
- The Ethereum account address and the network ID are displayed.
- Instructions:
- A static message guides developers to edit the
src/App.jsxfile.
- A static message guides developers to edit the
- User Operations:
- If the Ethereum account is connected, options to "Register", "Login", "Delete", and a textarea to display the authentication token are presented.
Testing the Demo App
After setting up the demo app and understanding its various components, it's time to test it out and see the Passkey authentication in action. Here's a step-by-step guide on how to test the demo app:
1. Start the React App:
First, navigate to the root directory of your project in the terminal and run the following command to start the React development server:
npm start
This will automatically open a new browser window/tab with the app running on http://localhost:3000.
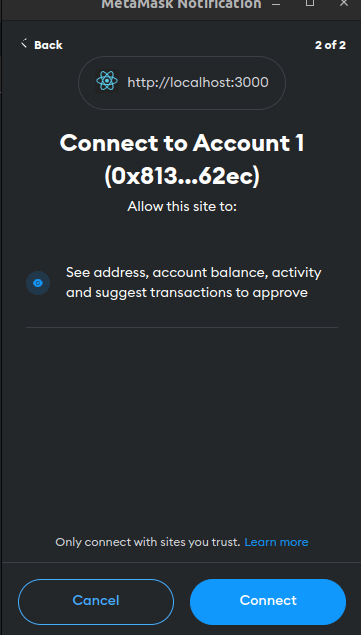
2. Connect Your Ethereum Wallet:
On the app's main page, you'll see a "Connect Wallet" button. Click on it. If you have an Ethereum wallet extension like MetaMask installed, it will prompt you to connect your wallet to the app. Grant permission.

This will open your metamask extension asking for permission to connect. Grant the permission.
3. View Account and Network Details:
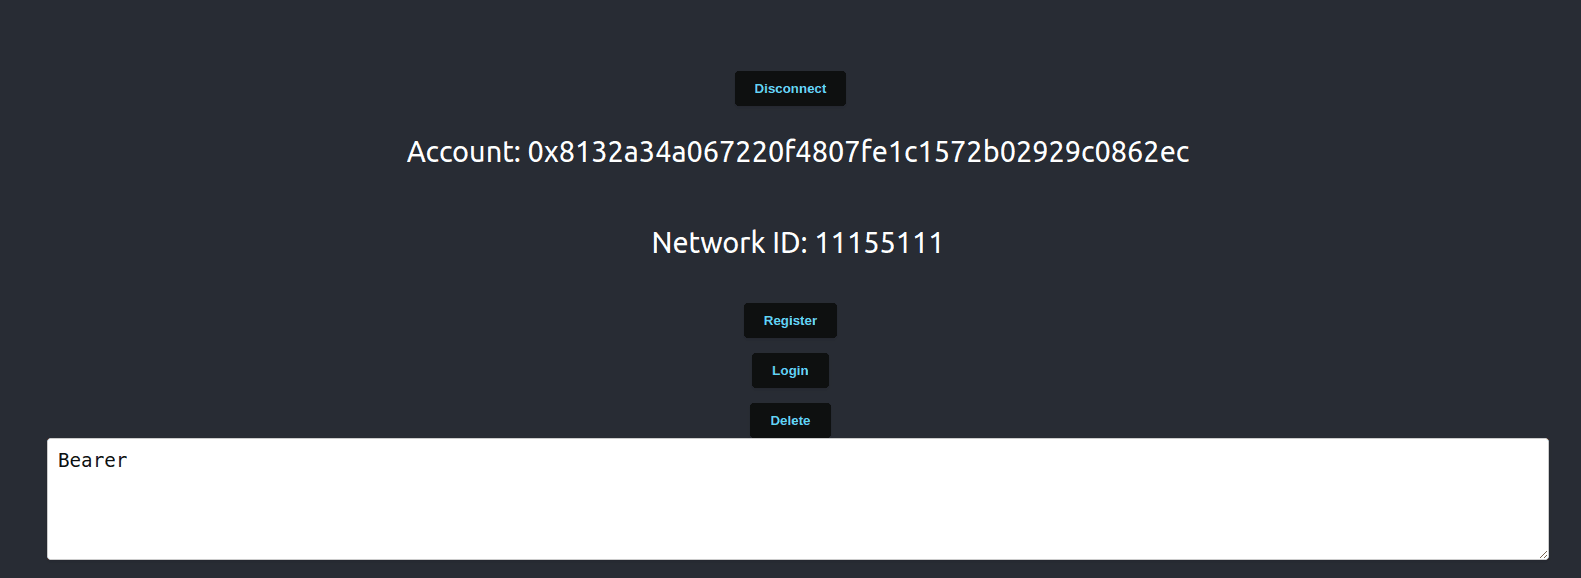
Once connected, the app will display your Ethereum account address and the network ID (or chain ID). This confirms that the app has successfully connected to your Ethereum wallet.
4. Register with Passkey:
Click on the "Register" button. This will initiate the Passkey registration process, which involves:
- Fetching an authentication message.
- Signing the message with your Ethereum wallet.
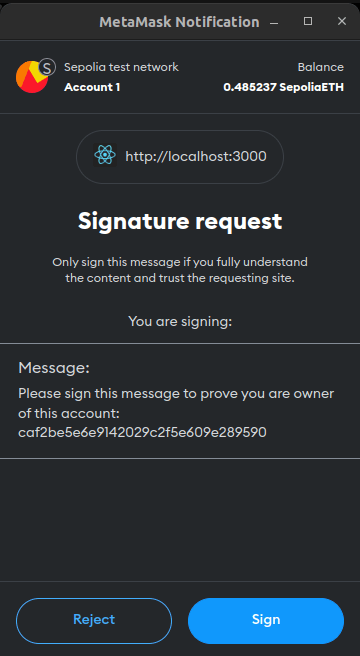
- Registering with the Passkey backend using WebAuthn.

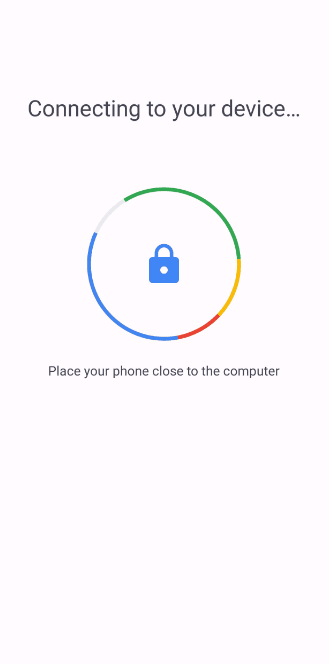
- Suppose you use your connected mobile phone with the same google account logged in
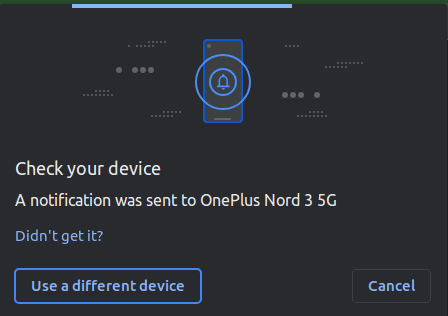
- Complete the verification on your phone
If the registration is successful, you'll receive an alert saying "Successfully registered with WebAuthn".
5. Login using Passkey:
After registering, click on the "Login" button. This will authenticate you using the previously registered credentials. Upon successful authentication, you'll receive a token, which will be displayed in
Conclusion
With the above setup, you now have a demo app that showcases the power and security of Passkey authentication. By combining the cryptographic strength of WebAuthn with the decentralized nature of Ethereum, Passkey offers a future-proof solution for dApp authentication. Dive in and explore the next generation of user authentication!